Sunday, June 3, 2018

Great Photography Resources in Today's World

Times have changed, and my gratitude for these days is abundant. And about photography especially so.


Gratitude makes sense of our past, brings peace for today, and creates a vision for tomorrow. 
               -Melody Beattie

I didn't have the internet as a teen, so I checked books out from the library which had collections by the great photographers. Here are just a few examples:

Henri Cartier-Bresson - used a simple 35mm Leica
rangefinder to capture edgy, journalistic images.
Look for the way he waited for the right moment
to take the photo.

Ansel Adams - Used a view camera to capture
what have become iconic photos of America's
natural beauty. Look for a full ranges of grays
with a solid black, a solid white,
and perfect composition.

Richard Avedon - Portraits of famous people.
If you ever want to take professional
quality pictures of people, friends,
or family, Avedon is the master.

Alfred Steiglitz - Steiglitz is rooted in
city life subjects and portraits and
probably influenced Avedon's work.

The long road to becoming a good photographer began with laying these big "cocktail table" books out on my bedroom floor and taking notes with the hope of learning their secrets -- the magic formula for a great photograph. What I learned was that a great photograph...

  • focuses on an extraordinary object or presents an ordinary object in an extraordinary way. 
  • is balanced visually and just feels right. (I later learned this is called composition.)
  • must capture a moment or tell a story. (Even something as simple as a cloud can tell a story.)
  • has a sense of triumph in it, something that makes it more than just a snapshot. You won't be able to say “Anybody could take that picture.” Sometimes this specialness is intangible.
  • has depth and richness of color.  You marvel at the colors in a National Geographic magazine photo or the incredible blacks and whites of an Ansel Adams and Alfred Steiglitz photo. Why? Because the colors in colored photos are rich, saturated, and go together well with just the right amount of light.  Black and white photos, on the other hand, with their full array of grays, will always include at least one perfect white and one perfect black. 
These observations were made in the early days of my photography journey, and I believe I was on the right track. You can go through this process too by analyzing photos of photographers you admire. Fortunately, we now have internet access to the work of all the great photographers along with the details and explanations of what went into creating their photos. 

How-to Information comes in many forms these days!


There is so much easily-accessible How-To information available through online articles and YouTube videos. The drawback to searching through all that free online content requires you to decide what is low quality versus what is high quality content. Unless you are retired with plenty of time on your hands, you are likely to find this sorting process time consuming and inefficient. 

Time savers online:

I have found reasonably-priced online courses are a time-saver because they present rich high-quality content in an organized way.  It is especially appealing in instances when you can try before you buy. 

Craftsy Unlimited now know as Bluprint gives your free trial access to thousands of hours of videos and classes in many categories including photography.   


Start your FREE Craftsy Unlimited trial at Craftsy.com


Signing up gives you full unlimited access to all of the photography courses and more.  I have taken photography courses such as Travel Photography, Food Photography, Nature Photography, Landscape Photography, and Night Photography.  (There are many more courses too, such as Lightroom Essentials, Portraits and Posing, Macro Photos, Family & Baby Photography, even a course on Mobile phone photography.)
What I like about the Bluprint Craftsy platform is that you can ask questions of the instructors, and they will give you personal answers and critiques of your photos (which they encourage you to upload to the site).

I'll share with you one example of an incredible Craftsy course I just took with National Geographic photographer, Jad Davenport, called Travel Photography

Many of the tricks and techniques Jad presents actually build upon the discoveries I glimpsed decades ago but could not at that time put into practice. Jad opened my eyes to new ways to balance being on vacation with getting the great photos.

Examples:


First, on my drive up to Vermont, I stopped along the way to smell the flowers (and take some pictures). I was at a rest stop which had a garden. I thought, why not try out my new macro lens? I learned how working with the shallow focus range (depth of field) and the out of focus background to create a good composition.


(By the way - if you would like a great FREE primer on flower photography?  Anne McKinnell has a blog post you will really learn from. https://digital-photography-school.com/8-ways-create-more-dramatic-flower-photos/)
While the intention of my trip to Vermont was to capture some great Fall colors, I was open to everything that might be "a gift," as Jad Davenport phrases it in his course. This covered bridge was one such gift.

A covered bridge captures the character of Vermont.
To continue about lessons learned from Jad Davenport's Travel Photography course, he talks about how to approach people and capture a moment. Still in Vermont, searching for Autumn foliage, I went into a diner for lunch, and it was absolutely empty.  I applied what I'd learned from Jad. 

First, I ordered lunch, then I asked the waitress if I could take some photos. I took a shot of the empty diner to catch the classic ambience. Then I used selective focus and a wide f-stop to get the bar stools.


In Vermont, diners and Mom & Pop places rule.

A telephoto compresses the image
and allows selective focus.
After the waitress got used to me shooting while waiting for my lunch to come out of the kitchen, I asked if I could take a photo of her. She said yes, and I got this photo which I think captures a moment. Compare it to the original version above which does not capture a moment. Jad Davenport gives an example of this in his course using his shot of a hummingbird.


Well? Did I manage to get those Fall color pictures in Vermont?  Check out my Vermont blog post here.

As for this post, I'm sharing the idea that finding the right course at a reasonable price can make a huge impact on your skills as a photographer and accelerate your growth. 


If these kinds of classes are of interest to you, please use the below link which supports this website and blog. 

Craftsy Unlimited FREE 7 day trial at Craftsy.com


Please post your feedback here, and be sure to attach your photos.


Thanks for reading  my posts!
Mike Shaw

P.S. check out my photo albums on Flickr and my photo-products at Fine Art Photography.


Wednesday, May 23, 2018

Three Essential Phone Apps Which Will Make you a Better Photographer

Yes, we've got some great cameras and lenses, and we have some decent photography skills. Let's not forget about the cutting edge information tools available on our PC's, phones and tablets.

It used to be that the only ones with access to cutting-edge technology were top government labs, big companies, and the ultra-rich. It was simply too expensive for the rest of us to afford.
                   --Peter Diamandis

The Grand Canyon from the South Rim.  Talk about being in the right place at the right time!  I happened to be shooting at sunset and -- BAM! -- the moon rose over the plateau in the distance. It shocked me. Getting this shot of the moonrise at sunset seemed like a miracle for me at the time. Why?  Because I took this picture on 35mm slide film back in the days before computers, mobile phones, and digital photography. In those analog days of film, luck played a huge part in getting a good photo.  Not so anymore!


What can you do today to minimize the luck factor?
 

Download 3 extremely useful apps, that’s what!

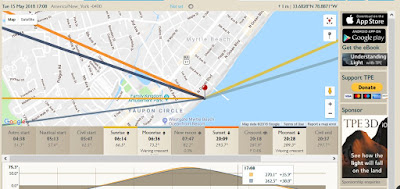
1.    TPE -- The first app I'd like to share is called The Photographers Ephemeris (TPE). This free app shows you on a map when and where the sunrise and sunset take place, and the moonrise and moonset as well, FOR ANYWHERE AT ANY TIME.

For example:    Are you going to be at Myrtle Beach at the 2nd Avenue bridge? If so, you’ll want to get the sunrise or moonrise over the bridge. TPE will show the exact line of the moonrise or sunset, and you can frame it with the bridge.


Screen shot - Myrtle Beach


So, before you take your trip, check out the landmarks on Google maps and in TPE. This will help you decide where and when you need to set up to get that perfect full-moon-rising or sunrise shot.

2.    The Google Sky Map –Interested in doing some night-time photography? Then The Google Sky Map app is a must. This free app for your phone is essential for capturing the moon, stars, Milky Way and planets. Once you open the app, go outside and point it at the sky. What you’ll see is a matched overlay of the night stars. Don’t be surprised if you get the added bonus of an out-of-this-world experience!

Take a look at this demo and the instructional video on YouTube:


3.    Star Chart -- Star Chart by Escapist Games is an app for tablet, desktop or phone similar to Google Sky Map, but seems more user friendly. Besides showing you the astronomical heavenly bodies, this app does a super job of showing the astrological constellations with beautiful pictures. Within the app there are many additional options such as a search feature and star locator. Check it out on YouTube:


Would you like to learn more about night photography? I recently took an information-packed course on Craftsy called Night Photography with Lance Keimig. Check it out here by searching in “Photography” at the top of the menu:   


Start your FREE Craftsy Unlimited trial at Craftsy.com  

I guarantee that using these apps will minimize the luck factor and have you shooting like a pro in no time!

ADDITIONAL ONLINE TOOLS:   Would you like a good explanation of how to online resources at NOAA.gov?  I took a Craftsy course called Photographing Coastal Landscapes with Kurt Budliger. Kurt explains the tricks to using weather and tidal charts to predict good sunsets and perfect beach scenes.

If you like this blog and these photography tips, please comment below.  Thanks for reading this!
Mike
 

Here is my Shutterstock Gallery

This is my commercial photo website where photos may be licensed for products or advertising:

Tuesday, May 15, 2018

5 Little Known Tips to Take Great Zoo Pictures

Make the most of your trip to the zoo. Let it be a photography excursion!  Family-album-style snapshots are not what you want. The goal is to try to make your zoo shots look like they were taken in the wild.  

If you can reach out and touch and love and be with wildlife, you will be forever changed, and you will want to make the world a better place.
      --Terri Irwin

You are about to learn 5 ways to add some quality to your own portfolio, and even help you when selling commercially. In any case, the process is challenging and fun!


Tip 1: Use a telephoto lens. It crops out as much background as possible, and...


Snow leopard at the Alaska Zoo (Anchorage, Alaska).


...the telephoto lens blurs the background (because of the narrow depth of focus).

This selective focus accentuates the subject in the meerkat photo (below), hiding the zoo enclosure wall detail.

Meerkat at the Metro Richmond Zoo (Richmond, Virginia).

Tip 2: Shoot from high above when the background isn't good.  Unless you are in a safari-park type of zoo, the background can look fake or distracting.

The bear (below) was photographed at eye-level in a habitat enclosure which is big and wide. It almost looks a bit too perfect, even though it is quite natural. And your attention wanders all over the picture.


Bear at at Maymont Park (Richmond, VA).

Here is the same bear (below) photographed from high above using a telephoto lens which crops and compresses the background.The bear is the center of attention.


Tip 3: When shooting through a glass window, put your camera lens right on the glass pane. This eliminates glare from behind you which might otherwise reveal that you are at the zoo. Ideally, a rubber lens shade works great because the black rubber is flexible and your lens is sealed to the glass window--glare free--while you can angle your camera into various positions. This works extremely well in an aquarium too. 

The white tiger (below) was photographed through thick plexiglass using a rubber lens shade against the glass.


White tiger, Metro Richmond Zoo, VA.
NOTE: When photographing at the zoo through glass, arrive early in the day when the glass is freshly cleaned. Late in the day both humans and the animals will have smudged the glass. 

Tip 4: Return again and again. Multiple visits to your local zoo will show you which animals are in the most natural settings, and you will also get familiar with their habits. I used my annual pass to keep returning to the cheetah habitat. When you identify specific animals as targets with photogenic potential, it is just a matter of time before you get some fabulous photos. If you buy an annual zoo pass at the beginning of the season, it’s worth it. You can return on numerous occasions when the weather suits you (and the animals) and get a variety of shots of the same animals.  

Adult cheetah, Metro Richmond Zoo, VA.
This adult cheetah (above) was photographed only after many visits. About one year later, I finally got some pictures of her cubs (below).  

Cheetah cubs, Metro Richmond Zoo, VA.
 

Tip 5: Be patient. It takes a lot of waiting--even in a zoo--to get a great picture. It is no different than being in the wild. Along with waiting you will need to take many shots of the same animal. After watching this Bengal tiger for at least 20 minutes, and 50 shots later, he finally yawned at me for this picture.
Bengal Tiger, Metro Richmond Zoo, VA.

I hope you liked these tips and they help you in planning your next zoo photo-safari. 
 
Useful accessory: For a very reasonable price you can get this great accessory rubber lens good.


https://amzn.to/2GITmru


When making comments, please attach your own zoo shots!  Thanks for reading. 

Thursday, May 3, 2018

Zion Nat'l Park & Bryce Canyon Nat'l Park

Having just returned from Zion National Park and Bryce Canyon National Park, I’m busily sorting through my pictures. Here are a few along with comments.


Waterfall (far left) in Zion Nat'l Park
 
I feel like I did have a bit of good luck in the West. Traveling in the spring enhanced the opportunity to see some snow, and fortunately, we had some snow on the last day in Bryce.

Zion is a very pleasant park to visit because there is a shuttle bus which runs all along the park and you can hop-on, hop-off wherever you like. The food is good at the lodge in the park and at nearby restaurants. In Zion, I tried for pictures of unusual rock formations. The biggest surprise for me was that I used my super wide angle lens (Sigma 8mm – 16mm) pretty much the entire time. I did use my 18 – 55 zoom lens for one particular scene where I wanted to bring in a waterfall a bit closer and 55mm was enough. I also used the polarizer on the 18-55 zoom because you cannot use filters practically speaking on the Sigma. Never did I use my telephoto in Zion, and that was new for me.

Cathedral Rock in Zion

For Bryce, I relied on my Sigma super wide angle lens, and I even did a lot of panorama images to be combined later. See below.

Panorama combination of four wide angle shots

I did use my telephoto in Bryce Canyon for some closer shots of windows in the rock formations.  Then, as luck would have it, a chipmunk ran across the path just then and I blasted off five or six shots before he could get away. It was a good thing I had the telephoto on my camera (Nikon 55 - 300mm zoom).


Uinta Chipmunk, common in Zion (Neotamias umbrinus)

The first day In Bryce, I took lots of photos without snow, and had bright blue skies. The second day was overcast, and photos were not impressive. On the last morning in Bryce, however, I looked out the window of the bed and breakfast, and everything was covered in snow! The skies were overcast, but quickly driving up to Bryce Lookout Point, the sky suddenly cleared. I was able to get some snowy canyon pictures with patches of blue sky and wispy clouds.  Just what I’d hoped for.


Sudden morning snowfall in Bryce Canyon

The other intention I had was to get some good night-photography pictures. Zion and Bryce are among the very few places on the planet with truly dark skies. I had booked the trip during the new moon, so the sky would be absolutely at its darkest.


Night sky over Bryce Canyon with scattered clouds
Unfortunately, there were some scattered clouds with a touch of overcast, and I didn’t get any shots of the Milky Way I was hoping for.  I did see better stars than I had seen in Richmond, but better night photography shall still remain on my bucket list. Night photography is always a great learning experience no matter what, and I feel like  this trip improved my technique in any case.

Would you like to learn more about night photography? I recently took an information-packed course on Craftsy called Night Photography with Lance Keimig. Check it out here by searching in “Photography” at the top of the menu:   


Start your FREE Craftsy Unlimited trial at Craftsy.com 


More Zion National Park and Bryce Canyon pictures here:
https://www.flickr.com/photos/mikeshawtoday/albums/72157694441780061/with/26890577897/

Thanks for looking!
Mike