If you can reach out and touch and love and be with wildlife, you will be forever changed, and you will want to make the world a better place.--Terri Irwin
You are about to learn 5 ways to add some quality to your own portfolio, and even help you when selling commercially. In any case, the process is challenging and fun!
Tip 1: Use a telephoto lens. It crops out as much background
as possible, and...
 |
| Snow leopard at the Alaska Zoo (Anchorage, Alaska). |
...the telephoto lens blurs the background (because of the narrow depth of focus).
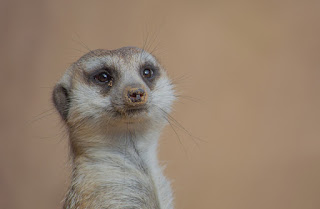
This selective focus accentuates the subject in the meerkat photo (below), hiding the zoo enclosure wall detail.
 |
| Meerkat at the Metro Richmond Zoo (Richmond, Virginia). |
Tip 2: Shoot from high above when the background isn't good. Unless you are in a safari-park type of zoo, the
background can look fake or distracting.
The bear (below) was photographed at eye-level in a habitat enclosure which is big and wide. It almost looks a bit too perfect, even though it is quite natural. And your attention wanders all over the picture.
Here is the same bear (below) photographed from high above using a telephoto lens which crops and compresses the background.The bear is the center of attention.
The bear (below) was photographed at eye-level in a habitat enclosure which is big and wide. It almost looks a bit too perfect, even though it is quite natural. And your attention wanders all over the picture.
 |
| Bear at at Maymont Park (Richmond, VA). |
Here is the same bear (below) photographed from high above using a telephoto lens which crops and compresses the background.The bear is the center of attention.
Tip 3: When shooting through a glass window, put your camera lens right on the glass pane. This eliminates glare from behind you which might otherwise reveal that you are at the zoo. Ideally,
a rubber lens shade works great because the black rubber is flexible
and your lens is sealed to the glass window--glare free--while you can
angle your camera into various positions. This works extremely well in
an aquarium too.
The white tiger (below) was photographed through thick plexiglass using a rubber lens shade against the glass.
NOTE: When photographing at the zoo through glass, arrive early in the day when the glass is freshly cleaned. Late in the day both humans and the animals will have smudged the glass.
Tip 4: Return again and again. Multiple visits to your local zoo will show you which animals are in the most natural settings, and you will also get familiar with their habits. I used my annual pass to keep returning to the cheetah habitat. When you identify specific animals as targets with photogenic potential, it is just a matter of time before you get some fabulous photos. If you buy an annual zoo pass at the beginning of the season, it’s worth it. You can return on numerous occasions when the weather suits you (and the animals) and get a variety of shots of the same animals.
This adult cheetah (above) was photographed only after many visits. About one year later, I finally got some pictures of her cubs (below).
I hope you liked these tips and they help you in planning your next zoo photo-safari.
Useful accessory: For a very reasonable price you can get this great accessory rubber lens good.
The white tiger (below) was photographed through thick plexiglass using a rubber lens shade against the glass.
 |
| White tiger, Metro Richmond Zoo, VA. |
Tip 4: Return again and again. Multiple visits to your local zoo will show you which animals are in the most natural settings, and you will also get familiar with their habits. I used my annual pass to keep returning to the cheetah habitat. When you identify specific animals as targets with photogenic potential, it is just a matter of time before you get some fabulous photos. If you buy an annual zoo pass at the beginning of the season, it’s worth it. You can return on numerous occasions when the weather suits you (and the animals) and get a variety of shots of the same animals.
This adult cheetah (above) was photographed only after many visits. About one year later, I finally got some pictures of her cubs (below).
 |
| Bengal Tiger, Metro Richmond Zoo, VA. |
I hope you liked these tips and they help you in planning your next zoo photo-safari.
Useful accessory: For a very reasonable price you can get this great accessory rubber lens good.
When making comments, please attach your own zoo shots! Thanks for reading.


No comments:
Post a Comment